Silicone sealant is a versatile product commonly used for sealing and bonding applications. However, there may be situations where you need to remove or smooth out excess sealant. Can you sand silicone sealant? In this article, we will explore the properties of silicone sealant, provide proper techniques for sanding it, and share some considerations and tips for achieving the desired results.
What Is Silicone Sealant
Silicone sealant, or silicone caulk, is a commonly used material in construction and home repair. Made from silicone polymers, it offers excellent sealing, waterproofing, and elasticity. It is widely applied in areas such as window frame sealing, kitchen waterproofing, and bathroom caulking. Silicone sealant effectively prevents the infiltration of water, air, and dust while providing some adhesive properties, making it an essential material in modern home improvement.
Can you sand silicone sealant
Generally, silicone sealant does not need to be sanded. Its primary function is sealing rather than decoration.
However, in certain situations—such as when the surface is uneven or requires further beautification—cured silicone sealant can be sanded appropriately. But attention, if you sand, it may lose its sealing function.
How to Use Silicone Sealant
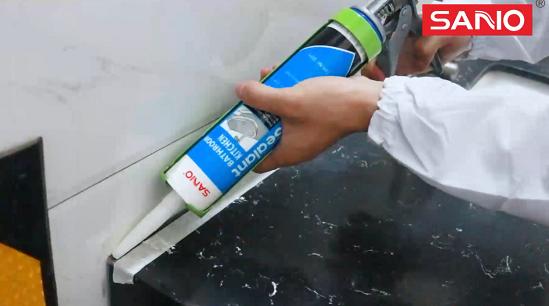
Using silicone sealant correctly ensures better sealing performance and appearance. Follow these steps:
1. Clean the Surface: Clean the bonding surface to remove grease, rust, or other impurities. If necessary, use a professional cleaning agent and lightly sand the surface with fine sandpaper to improve smoothness.
2. Mask the Area: Apply masking tape around the joints or adjacent areas to ensure clean, straight lines and prevent sealant from spreading to unwanted areas.
3. Apply Evenly: Spread the silicone sealant evenly on the joint. For two bonding surfaces, avoid leaving gaps to ensure a proper seal.
4. Smooth the Surface: Use your finger or a spatula to press and smooth the sealant for a neat and even finish.
5. Clean Excess Sealant: Remove the masking tape and clean any excess sealant with a cloth or paper towel.
6. Allow to Dry: Let the silicone sealant dry completely. The surface drying time is typically ≤12 minutes, and complete curing takes about 48 hours.
Watch our teaching video about how to apply silicone sealant.

How to Sand Cured Silicone Sealant
While silicone sealant is easy to smooth when wet and moist, it becomes hard and less adjustable once dry. To achieve a smooth and even surface on cured sealant, follow these steps:
1. Ensure Full Curing: Before sanding, ensure the silicone sealant has fully cured. Remove any loose or excess sealant with a utility knife.
2. Choose the Right Sandpaper: Use fine-grit sandpaper to avoid damaging the surface or leaving visible scratches.
Sand Evenly: Gently sand the silicone sealant with even pressure. Take care not to damage the surrounding surfaces, and periodically rinse to remove residue buildup.
3. Check the Progress: Regularly check the sanding progress. Repeat the process as needed until the desired smoothness is achieved.
Considerations and Tips for Sanding Silicone Sealant
– Avoid excessive force: Do not apply excessive pressure while sanding, as it may damage the surface or affect the integrity of the remaining sealant.
– Patience is key: Sanding silicone sealant may take time and patience, especially for thicker or wider applications. Take breaks if needed and continue sanding until the desired result is achieved.
– Clean the surface: Once the sanding is complete, thoroughly clean the surface to remove any residual particles or debris.
– Consider alternative methods: If sanding is not achieving the desired results, you may consider using a silicone sealant remover or contacting a professional for assistance.
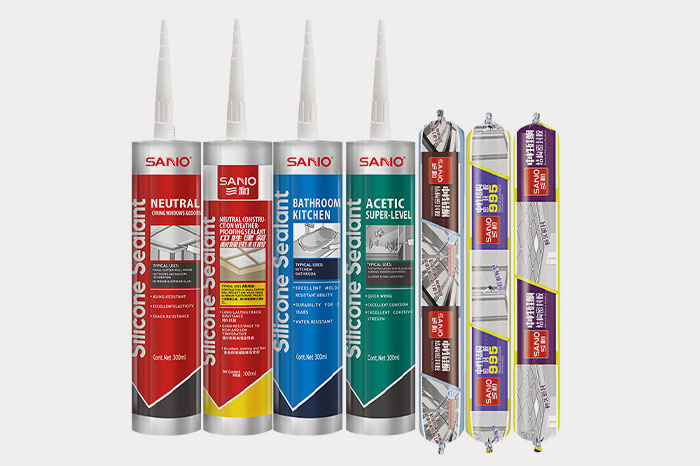
SANVO’s Silicone Sealant’s Benefits
1. Versatility: SANVO’s silicone sealant is highly versatile and suitable for a wide range of applications. From construction and industrial projects to household repairs and crafts, it can be used for sealing, bonding, or filling gaps, making it a valuable addition to any toolkit.
2. Easy Application: SANVO’s silicone sealant is designed for easy application. Its smooth consistency allows for effortless application using a caulking gun, ensuring precise and controlled dispensing. Any excess sealant can be easily cleaned up, resulting in a neat and professional finish.
3. Aesthetics: SANVO’s silicone sealant not only provides excellent performance but also enhances the aesthetics of the project. With its smooth finish, it creates a visually appealing seal, contributing to the overall appearance of the application area.
4. Trusted Quality: SANVO Company is committed to delivering high-quality products, and their silicone sealant is no exception. With a reputation for reliability and customer satisfaction, SANVO’s silicone sealant is trusted by professionals and DIY enthusiasts alike.
Learn about our silicone sealant products.
Conclusion
While sanding silicone sealant can be challenging, it is possible with the right techniques and patience. By following proper sanding techniques and considering the specific properties of silicone sealant, you can achieve a smooth and satisfactory result.